Link: https://youtu.be/dvAsmo32uo0
Had to add something
We finished editing our opening and realized it was missing something important, we were missing natural sound. The only way we could add audio without having to reshoot the entire thing. We concluded that it would be best to use foley sounds to mimic some things in White Coat. What we could record was water falling, glass clinking, water boiling, ropes, water drips, a screech, the turn of a switch, and other sounds as well. I think with these sounds our film opening will be complete and well rounded.
These foley sounds will add an extra layer for the viewer and make them more immersed in the film opening. Once we record and add in the foley sounds, we will export and upload the opening to YouTube, and this blog, and finally show it to the world! White Coat is the next must-see thriller!
The end of a marathon
*Breathes In*
*Breathes Out*
Wow. I have finally reached the end of my project. Throughout this project I have learned a lot of things that I can hopefully apply to the future. I have learned to budget my time, plan out things with enough time, and have improved my production skills , I can now say I have worked on a film and have the experience when I do another one. In my Creative Critical Reflection I will be reflecting more on the process of my project. Speaking of the CCR, I am almost done with the script, and if everything goes as planned, I will film it this weekend.
As far as editing, we are nearly done. My partner, Nico, created a nice beat on GarageBand that really fits the mood of White Coat. When we finish editing we are going to decide if we want to include it or not. Next week we will out the final touches and fixing any little mistakes that we might see. To be honest, the hardest part of the editing process was finding and cutting clips because for some reason, when we imported our clips into Premiere Pro, it imported with all of the clips out of order.
I almost forgot to explain how I am going to market and distribute White Coat! Since we are aiming for a younger audience, we will be aiming to use technology that is familiar with that audience. We plan on creating a strong build up and high anticipation to the film opening on social media with hashtags (#) and posts that promote the opening. We are going to use social media platforms that are common with our target audience such as Instagram, Twitter, and Snapchat. As far as distribution goes, through further research we have realized that YouTube has a very big fan base and is known for the successes of music videos, films, and artistic videos. The success of many videos has projected many young and budding artists to fame and fortune. For those reasons, we believe that our opening will have success.
A little bump in the road
This is what happened, one of my group members found the song we wanted to use and it said “Royalty Free Music” in the title. With a closer look to the description, it stated that rights needed to be purchased in order to be used. So just to be sure and not get in trouble with any parties involved, we made sure to purchase the rights to the song. The license is at the bottom of this blog.
On a side note, we ended up changing the ending of our film opening. This change was necessary because of our stage set up. To be honest, I think the change to the ending was for the better and will provide for a better final result.
Other than that, we are about half way done editing. Since our story is rather long we are most likely going to be a little under two minutes or hit it two minutes exactly.
We are fast approaching our deadline, in response, I have started working on my Creative Critical Reflection. Since it is a rather in depth reflection, I took the advice of my teacher and started planning and started writing a script for it. My current intention is for my Creative Critical Reflection to be at least five minutes in length. In my CCR I have to answer four main questions, and depending on how in-depth I answer them, it could go over five minutes.
In the next blog posting, I will update you on the final steps that need to be done in order to wrap up my film opening, White Coat.
Here is the license certificate to our song:

An update on post production
Post production has gone really well. We found a nice looking font we want to use called “Catenary Stamp” on dafont.com, for the link to the font, click here. We made sure to choose a font that was in the public domain and fit the style and look of our film. We don’t want our opening to be basic and have text that cuts in and out, so we are going to go into Adobe After Effects in order to edit in the font so it moves with the movement in the camera. This effect makes it seem like the font exists in the world of the character.
Similarly, we found Royalty Free music on YouTube that fits the pacing that we are looking for. It is slow paced and suspenseful. White Coat is going to incorporate some parts where the shots are sped up for visual enhancement, in that case we are going to try as best as possible to line up the edit with the pacing of the music. If you want to listen to it yourself, click here.
Here are some clips from our from shoot. I had to compress them because they were nearly 1 GB file sizes, it would've taken too long to upload! In the first clip we played some music during the shoot so the actors would be able to get into the "groove" of playing their role. We are not going to include this music in the opening.
Had to learn some shortcuts
A few months back my same group worked together on a music video project and we didn't make it very complicated. We mainly shot in two locations and overshot. What helped when editing was that we overshot and had a large variety of clips to choose from.
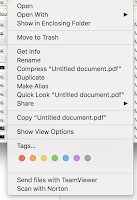 We took a lesson from that project and applied the same idea to our film opening: we overshot. As a consequence, we have tons and tons of footage to go through. Here and there there are a couple of shots that we REALLY want to use, so first we have to go through all of our footage to find them before importing all clips into Premiere Pro. In Mac OS, you can right click on a file (video clip file) and "tag" something with a color, that way you know that that particular clip is one that you want to use. The different types of tags have a wide range of colors, as seen on the right on the bottom of the list.
 Once we got into our editing software, Premiere Pro, and started putting together a couple of clips, we noticed that it was taking a long time to edit. I have edited in Premiere before but I just use basic cuts and nothing that is advanced. In my version of Premiere Pro their is a panel with tools on the left of the timeline. All of the tools are show on the right side. I knew that they were supposed to be used for something and that they could speed up editing.
After editing a small portion of my film opening, I decided to delve into the software a little more and read about the tools. I came across a very good article [1] that explained all of the shortcuts and the tools themselves. Some of the tools such as the Pen and Razor tool allow you to refine your edit. All of the tools in Premiere have a keyboard shortcut, as shown at the bottom, which can save you time in the long run. I will definitely be taking this into account and hopefully speed up and refine my editing in the process!

[1] Leirpoll, J. (2017, December 31). 20 Vital Keyboard Shortcuts for Adobe Premiere Pro Editing. Retrieved March 28, 2018, from https://premierepro.net/20-vital-keyboard-shortcuts-adobe-premiere-pro-editing/
 We took a lesson from that project and applied the same idea to our film opening: we overshot. As a consequence, we have tons and tons of footage to go through. Here and there there are a couple of shots that we REALLY want to use, so first we have to go through all of our footage to find them before importing all clips into Premiere Pro. In Mac OS, you can right click on a file (video clip file) and "tag" something with a color, that way you know that that particular clip is one that you want to use. The different types of tags have a wide range of colors, as seen on the right on the bottom of the list.
After editing a small portion of my film opening, I decided to delve into the software a little more and read about the tools. I came across a very good article [1] that explained all of the shortcuts and the tools themselves. Some of the tools such as the Pen and Razor tool allow you to refine your edit. All of the tools in Premiere have a keyboard shortcut, as shown at the bottom, which can save you time in the long run. I will definitely be taking this into account and hopefully speed up and refine my editing in the process!

[1] Leirpoll, J. (2017, December 31). 20 Vital Keyboard Shortcuts for Adobe Premiere Pro Editing. Retrieved March 28, 2018, from https://premierepro.net/20-vital-keyboard-shortcuts-adobe-premiere-pro-editing/
Color Correcting lesson
While on the shoot we watched back some of the clips we shot in the camera. I think we agreed for the most part that some of the shots needed to be fixed visually wise. By fixing we meant basic color correction, and that needs some understanding in order to be done correctly. Since we are on spring break I thought that it would be best to go ahead and learn some basic color correction until class starts back up again next week.
I watched a few videos on YouTube (some of them are embedded below) and actually learned some valuable tips on how to color correct. I took away three essential tips on how to color correct. The first being that Premiere Pro has some basic built-in presets, if you are short on time, to adjust the color of a particular clip or clips using an adjustment layer. The second tip was to go into the "Basic Correction" section of the Lumetri Scopes panel to individually adjust elements such as the Temperature, Exposure, Contrast, and Tint. Last but not least, when it comes to strictly adjusting the colors of an image, it is very effective to use the Curves section on the Lumetri Scopes panel. Since each pixel on a screen are made up of individual red, green, and blue dots. The Curves section allows you to change each red, green, and blue color channel of an image to one's desire. So, if you're looking for a very red image, you simply bring up the reds.
I want to gather as much knowledge as possible before I start editing in order to make that process as smooth as possible. Hopefully these basic color correction tips and tricks will help to improve my shots when my group starts to next week.
White Coat

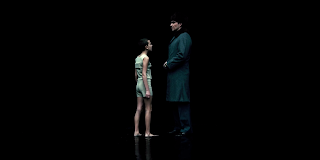
 What ended up working to our advantage was that we made good use of a fog machine. I'm not trying to be biased or anything, but the use of fog created some really cool visual effects. Not only did it create good looking visual effects, it helped in the sense that our genre was suspense/thriller. If you reference other suspense films, many use fog to assist in setting the mood, as seen in the final pictures. - I never really explained why we chose the title White Coat. As we were filming, we decided to put an emphasis on the scientist and his "crazy" experiments. We tried to depict a scientist that was not your everyday person, rather someone who was not mentally "okay". Since we put focus on the scientist, we decided that the title White Coat was the best choice.
Now that production is wrapped up, we can put full force on post production and make the best possible film opening.


Final preparations
It's the start of the spring break week but that does not mean much. My group is about to get the ball rolling with our film opening on Tuesday and start production. Being honest, it makes it easier on us that the time limit to the film opening is only 2 minutes, meaning if it were longer we would likely have to shoot on more than one day.
Today I went to Party City to pick up the lab coat, and gathered the final supplies. Tomorrow, I will be putting together the set in my garage so we can set full steam ahead Tuesday morning.
 While I was looking over one of my previous posts where I referenced lighting, I wondered how I was going to achieve a particular set up since I don't have expensive lighting equipment. After thinking for a while, I drew a rough draft on a sticky note of what I thought would be the best set up as shown on the right. My visualization was to set up a desk lamp on a top of a ladder which would extend over the subject. This lamp would then shine down on the subject and would allow you to adjust your camera to the appropriate settings.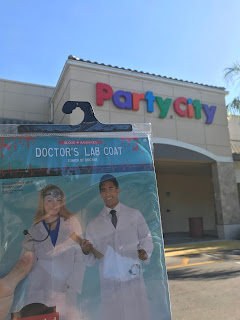
Supplies/Props update
There is good news and bad news. In all fairness, there is more good news. The good news being that our shoot is still on as scheduled and that I have most of the supplies that I listed in the previous blog posting. The bad news is that I will have to purchase a lab coat since that is currently the only prop that I don't have. I know we are not supposed to spend money on this project but it will be necessary because the lab coat makes the actor look more like a scientist than a random person. Looking back on it we could have changed our plot but this storyline mad sense to us and a small investment in a lab coat is just a minor side effect. We found this lab coat on the Party City website that will just about do it for us.


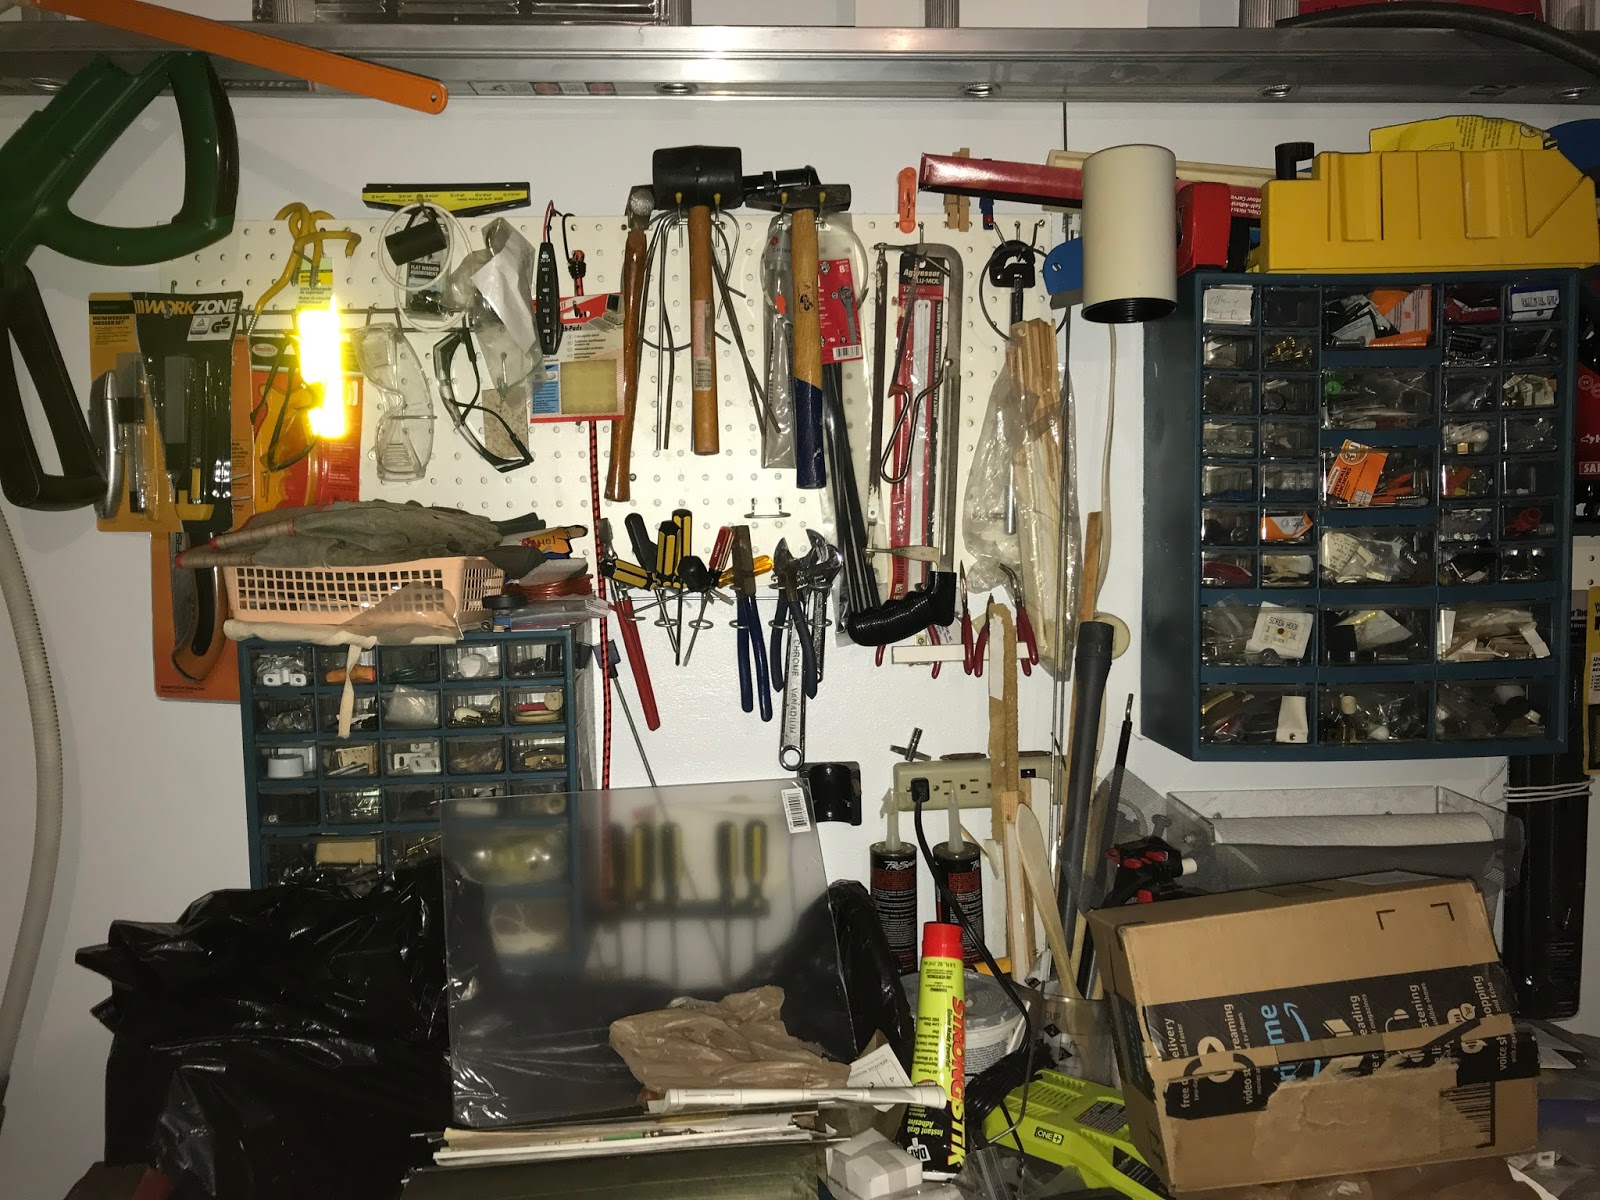

These are some of the props we have gathered so far. The picture of my garage is where we will shoot the film opening. Over the weekend, I will need to pick up the lab coat from Party City and put together the rest of my props. Once we finish production, we will have to come up with a final name. We have come down to two options, White Coat or The Alchemist, we will see which one turns out to be the better choice in the long run and go with that one. Production is scheduled for Tuesday March 27, and we will likely take up a good 6-8 hours to film the whole thing. In my next posting I will most likely update this blog on how I plan to execute post-production and what we will need to do in order to edit effectively and in the best way possible after our shoot next week. Next week's posts will encompass how our production phase goes, such as putting together the set and the actual shoot itself.
Planning is finally complete!
Finally, for the second time I was able to meet with the majority of my group. Together we were able to finish our storyboard and figure out what we need in order to shoot. We also established a date of production and what kind of props and materials we will need. Since we have no funding for our film opening, we concluded it was best to shoot in one of our garages, or in one of my classmates warehouse. We thought of the majority of the props we need for our shoot that we included in our storyboard.
 Some of these props are:
- chairs
- tables
- tools
- a lock box
- lab coat
- lab goggles
- beakers
- liquid that can bubble
- lights
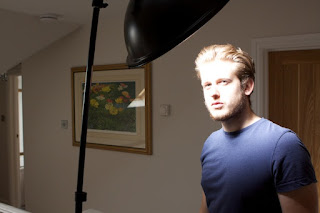
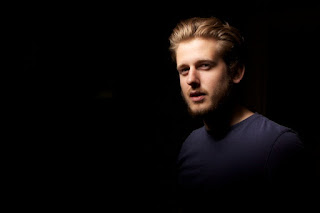 Since we are creating a suspenseful film opening, we are going to rely heavily on lighting to create a dramatic effect. The lighting technique we are looking to use is called low-key lighting. [1] This type of lighting effect, as shown on the right, allows for only the subject to be illuminated while keeping the background in the dark. Low-key lighting requires a DSLR camera in order to capture the most optimized image by making the shutter speed 1/1000 and lowering the f stop to f/8, only allowing in 1/64 of the previous amount of light into the camera. These settings produce the image as seen on the right, greatly dramatizing the subject with only one light from above. In the next posting I will likely have most of my props gathered and will update you on how
I am prepping for my production date of Tuesday
March 27, 2018.
[1] How to Use Low Key Lighting for Dramatic Photography » Expert Photography. (2018, February 21). Retrieved March 21, 2018, from https://expertphotography.com/low-key-photography-dramatic-lighting/
 Some of these props are:
- chairs
- tables
- tools
- a lock box
- lab coat
- lab goggles
- beakers
- liquid that can bubble
- lights
 Since we are creating a suspenseful film opening, we are going to rely heavily on lighting to create a dramatic effect. The lighting technique we are looking to use is called low-key lighting. [1] This type of lighting effect, as shown on the right, allows for only the subject to be illuminated while keeping the background in the dark. Low-key lighting requires a DSLR camera in order to capture the most optimized image by making the shutter speed 1/1000 and lowering the f stop to f/8, only allowing in 1/64 of the previous amount of light into the camera. These settings produce the image as seen on the right, greatly dramatizing the subject with only one light from above. In the next posting I will likely have most of my props gathered and will update you on how
I am prepping for my production date of Tuesday
March 27, 2018.
[1] How to Use Low Key Lighting for Dramatic Photography » Expert Photography. (2018, February 21). Retrieved March 21, 2018, from https://expertphotography.com/low-key-photography-dramatic-lighting/
A busy week
 This blog posting is going to be more of an update rather. I’m not going to hide anything and will be 100% transparent. I didn’t have time to think about this project this week. After a hectic week I came home from Nashville with an Honorable Mention in a competition called Crazy 8. Not to forget that my teammate also won 3rd place in Social Media Story.
While I was occupied at the convention, I noticed that in the majority of workshops I was in they all had a common theme that could be applied to mostly everything. That was that every story should have a beginning, middle, and end, or in other words, a rising action, a climax, and a resolution. In my film opening I will need to implement a rising action, but not a climax since it is merely an opening and not a short film. This coming week I will refocus my attention onto the film opening, especially considering the deadline is fast approaching. No time to waste, time to get to work!

Not much has changed
Since my last posting, nothing new has come up. What I can do now is become as well informed as possible about my production and general tips to speed up production. I forgot to mention, but we will likely not need a script since we don't plan on including dialogue, which will allow us to go straight off of what we storyboarded.
I knew going into this project that I am not Stephen Spielberg and that I needed to take in as much information to grow and learn. Taking note on other's experiences in the field is the best way to improve your production. I considered that mentality and looked for production tips and tricks for films on a budget. Because, obviously, we have a budget of 0, nada, zip, null.
While looking for articles on the internet, I found two that had really good tips. One centered on how to produce a film with a low budget (click here), while the other focused on tips of how to create an encouraging successful production (click here).
After reading through these articles, I took away two noteworthy things. In the first article I noted that it is important to plan with one shooting location, or as few as possible, in order to increase the time of production and reduce time spent on packing, unpacking, and traveling. Similarly, in the second article I noted that it's important to schedule scenes chronologically so the story flows smoothly and to not abuse the crew during production. If you want to read more of the articles be my guest, but what I learned from these articles is worth a lot more than one can pay for, so it's best to take it in, appreciate it, digest it, and figure out how I can use it.
[1] Westin, J. (2014, May 29). 10 Tips for Successfully Producing a Micro-Budget Feature. Retrieved March 11, 2018, from http://www.indiewire.com/2014/05/10-tips-for-successfully-producing-a-micro-budget-feature-25970/
[2] Shorr, A. (2018, January 25). 15 Pro Tips to Create a Better Production Schedule. Retrieved March 11, 2018, from https://www.studiobinder.com/blog/15-pro-tips-to-create-a-better-production-schedule/
The start of a hectic week
Tomorrow I will be leaving for the rest of the week to a National competition for TV Production in Nashville, TN. My school will be competing in a competition as a whole where we make an 8 minute news show based off of a prompt in 8 hours--all impromptu. I will also be competing in an individual competition with a smaller group to make a convention recap over the course of a few days. This National competition will feature some of the best in high school and middle school TV Production, including our fiercest rival: Hawaii. Last year schools from Florida got in a chanting fight with Hawaiian schools, and that got very intense to say the least.
Enough about the competition! What I want to say is that I will have little to no time over the course of the remaining week to stay focused on my film opening, let alone do work for other classes. So what I intend to do is lay out a physical schedule so I know what I have to do when I get back, and hit the ground running--maybe sprinting--while I'm at it.
Week 1: (2/26-3/4)
- start brainstorming
- start thinking of plot
- conduct research on chosen genre (thriller/suspense)
Week 2: (3/5-3/11)
- keep brainstorming/float ideas
- begin planning
- brainstorm title
Week 3: (3/12-3/18)
- start planning logistics for shoot
- complete the plot for Week 4
Week 4: (3/19-3/25)
- finalize details of film opening
- finish storyboard
- gather any remaining items necessary for shoot
Week 5: (3/26-4/1)
- shoot opening
- begin editing
Week 6: (4/2-4/8)
- edit, revise any necessary portions of opening
- reshoot if we are missing anything
Final Submission date: 4/14
- upload final version of film opening, finish blog
Some progress has been made
Our full group finally met today for the first time and we made progress on our opening. We actually did a lot, we discussed the plot, brainstormed further possibilities for the ending, storyboarded the first 15 shots of the opening, and came up with two candidates for a title: White Coat or The Alchemist. Obviously things such as our title aren't set in stone, but we are pretty confident in what we discussed.
I'll start off by saying that we kept the same idea of a person strapped to a chair but changed the setting a bit. In order to make production easier, we decided to not go with a pure black setting and instead incorporate the idea in a different way: change it to a laboratory. The laboratory basically serves the same purpose as I said in previous posts but allows us to change up the dynamic while allowing for an easier production phase.
 We tossed around many ideas for the ending but couldn't agree on an effective and suspenseful ending that would be easy enough to produce with our budget of $0.
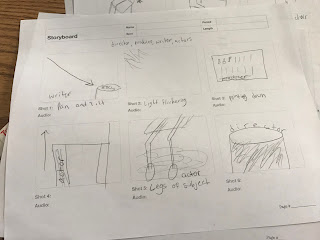
Since we couldn't come up with an idea we decided to not waste anymore precious class time and started storyboarding on what we did agree upon. The main character would be strapped to the chair and notice the tools in front of him/her. During these initial shots we want to show the titles from the contributors such as producer, director, and actors. The actor would eventually break the straps and get out of the chair and look
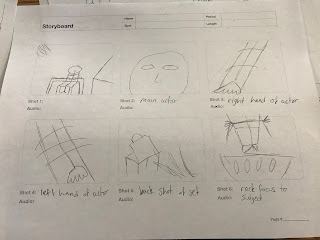
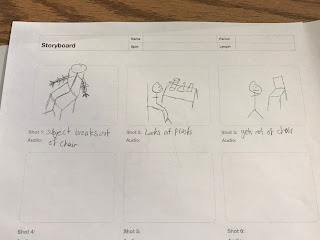
around in confusion, not knowing how they got there. This is the point where the actor turns and looks and either notices the lab itself, or sees a pathway to the lab, which would be the only pathway out. We haven't figured out which one we are going to do but will figure it out soon.
We storyboarded up to this point and will pick up next time we meet, if not we will have to do it another time because it's crucial for the production phase. Next time, we also plan on coming up with the ending and the title for the opening.
I'll start off by saying that we kept the same idea of a person strapped to a chair but changed the setting a bit. In order to make production easier, we decided to not go with a pure black setting and instead incorporate the idea in a different way: change it to a laboratory. The laboratory basically serves the same purpose as I said in previous posts but allows us to change up the dynamic while allowing for an easier production phase.
 We tossed around many ideas for the ending but couldn't agree on an effective and suspenseful ending that would be easy enough to produce with our budget of $0.
Since we couldn't come up with an idea we decided to not waste anymore precious class time and started storyboarding on what we did agree upon. The main character would be strapped to the chair and notice the tools in front of him/her. During these initial shots we want to show the titles from the contributors such as producer, director, and actors. The actor would eventually break the straps and get out of the chair and look


around in confusion, not knowing how they got there. This is the point where the actor turns and looks and either notices the lab itself, or sees a pathway to the lab, which would be the only pathway out. We haven't figured out which one we are going to do but will figure it out soon.
We storyboarded up to this point and will pick up next time we meet, if not we will have to do it another time because it's crucial for the production phase. Next time, we also plan on coming up with the ending and the title for the opening.
I forgot something
As I went to bed last night, I thought, to my self, what am I missing or doing wrong? That type of thinking couldn't have come at a better time! I woke up today in realization that I needed to do more research on target audience and genre in order to output a more interesting and effective film opening.
Honestly, I have no clue what I specific information I am looking for but I'll figure it out by the end of this posting. Since my film openings' genre, suspense, is a sub-genre of the thriller genre, I will be conducting the majority of my research on thrillers.
According to the National Metro, a majority of thriller moviegoers are under the age of 25, and 57% of all thriller moviegoers are female. So, based off of that we already know to skew our focus to the younger population and a little towards females. Furthermore, this target audience research website concluded that audiences like to relate themselves with the protagonist and antagonist in a thriller. See, typically in a thriller film there is a female protagonist (victim) and a male antagonist (dominant). This is done intentionally so the audience can relate with stereotypes: females as vulnerable and weak, and males as strong and dominant. We likely won't have a strong or dominant character in our opening since it will likely only feature one character.
filmsite.org states, "[Thriller and Suspense] are types of films know to promote intense excitement, suspense, a high level of anticipation, ultra-heightened expectation, uncertainty, anxiety, and nerve-wrecking tension. [These] films are virtually [interchangeable], with similar characteristics and features." This can be done using fast-paced editing, along with good planning to incorporate various shots, angles, and movement.
Producing a film opening that hits the younger audience and employs thriller characteristics is critical in the 21st century. Not only is important to market, but is more important to market wisely. If you market using traditional brick-and-mortar stores, you will not hit your Millennial and Generation Z audience. It is easier, more effective, and cheaper to use social media to market a film.
All this gibberish might sound confusing to some, but what I am trying to say is that if my group does not utilize what I mentioned above, our opening would have a tough time surviving in the real world, where things can get ugly.
Let the planning begin
The more I think about it, the more I realize that my advisor was right. I should’ve thought more about my group selection when I selected my group. Now I know that my advisor is thinking, “Yup kid, you should’ve listened to me when I told you this,” as she reads this. Where I am getting to is that I will probably have to start the planning phase myself. I previously worked with the same group for another project and we ended up completing it pretty well, but the majority of it got put off until the last weekend. The lesson learned is to make wiser choices when it comes to working with others. My advisor is likely thinking, “Kid, hmmm, I’ve been doing this for a while, listen to me next time,” and you bet I will listen.
 My entire group is not here today so I need to start myself. I plan on starting my planning stage through storyboarding. With storyboarding, I can visualize each scene in my film opening, also allowing the production phase to be smooth and quick. If you have no idea what is a storyboard, it is a sequence of drawings, typically with some directions and dialogue, representing the shots planned for a movie or television production.
For a two minute production, our group will require an extensive storyboard to cover the various shots, angles, movement, and composition. As of now, we intend to not include dialogue in order to make our opening have a suspenseful mood, keep the viewer on the edge of their seat, and convey a misgiving tone of calmness. Not including dialogue will make our planning phase a lot quicker as we do not need to plan or think about what the main character will say. I will first start storyboarding the shots up to the point where my group agrees upon in the plot.
You may have gotten lost in this post, but I intend on completing the storyboard within the next week. This obviously isn’t something that should be taken lightly, because it is, one of the, if not the most important stage of the production. Oh! I forgot to mention, we still haven’t come up with a title, but will probably have one by the end of the planning and right before we shoot. If we don’t come up with a title by then, it will likely come during post-production.
Still haven't decided
Currently I am writing to you in an exhausted manner. Yesterday was a loonnngggg day for me, I got up at 6:15 am and went to sleep at 11:30 pm.
 Anyways, my group still has not finalized our plot but after seeing some scenes of TV series and films I will be bringing up to my group the visualization of our film opening. Watching Interstellar and Stranger Things allowed me to see how I would want the setting and mood to be. Shown to the right are some pictures of Interstellar and Stranger Things. I want to emphasize these two scenes. In the first image, Matthew McConaughey is trapped in time (let's consider this a void) and can see how the world has moved on without him. In the second image, Eleven is in some stage of an intense dream where she can see anything when she puts her mind to it, but this isn't a typical dream.
 Anyways, my group still has not finalized our plot but after seeing some scenes of TV series and films I will be bringing up to my group the visualization of our film opening. Watching Interstellar and Stranger Things allowed me to see how I would want the setting and mood to be. Shown to the right are some pictures of Interstellar and Stranger Things. I want to emphasize these two scenes. In the first image, Matthew McConaughey is trapped in time (let's consider this a void) and can see how the world has moved on without him. In the second image, Eleven is in some stage of an intense dream where she can see anything when she puts her mind to it, but this isn't a typical dream.
In my film opening, the main character is trapped in a void but cannot see anyone in the real world. In essence s/he is in their own little dimension, separated from society, and has no clue how s/he got there. The absence of setting provides a sense of suspense along with the absence of sound. The main character would eventually find how to escape the void by the end of the opening. If this film were to be fully produced, it would have the ability to go in many directions. Due to the appeal of the possibility of many different adaptations after the opening, the film, not yet named, would have a great appeal to many in the industry because of its inexpensive production as mentioned in the previous blog posting.
Many things still need to be done, but this only the beginning. I cannot wait to pitch my visualization to my group and hopefully the ball will start rolling from there!
Now what?
Now that I chose my genre, the lengthy process of planning has begun... Looking back at my last post, I really didn't elaborate on the plot of my film. My group and I have come up with an idea, but since this is a film opening and not a short film, only a short development of the film will be produced rather than revealing the entire plot.
At first, we brainstormed how we could implement elements of suspense. We decided to center our opening around audio, or lack thereof. In our film, we decided to incorporate minimal sound. With little to no sound, the viewer creates a sense of tension, [1] due to the lack of sound. This tension builds within the viewer as they do not know what's going to happen next. I'm getting off track...but the point is there will purposely be close to no sound.
After ALL that, I'm not going to waste anymore of your time or my time. The opening starts with the main character strapped to a chair and waking up to a state of confusion because they are in an empty abyss, and have no idea how they got there. In front of them will be a table with a few tools. These tools are meant to be used to escape the abyss/void. After freeing themselves from the chair, the main character puts on another face of confusion due to the uncertainty of where they are. After some time, the subject finds some sort of passageway that is closed and locked, almost inviting the subject to come and open it. Eventually the subject finds a way to open the passageway out of the abyss, but the viewer does not see what is on the other side, leaving the viewer on a cliffhanger.
Obviously our plot is not set in stone. It will be developed, changed, amended, as necessary, but the general idea is mostly agreed upon within the group. Let's see how this turns out!
[1] Film Genres Facts. (n.d.). Retrieved March 02, 2018, from https://www.scribd.com/document/79760590/Film-Genres-Facts
A new journey...
Welcome! Through this blog, I will be chronicling my journey of producing a film opening! Buckle yourself in because you're in for a long ride! No looking back now! Let me cut straight to the point. I have never had to think about what I did nor deeply process my actions to come up with a comprehensive understanding of my actions, as I will do in this blog. From what I understand, this is not meant to be tedious, but rather a way to document and process my journey in creating a film opening. Let the journey begin!
Being honest, I have no idea where to start as this is a multifaceted process with many possible routes to choose from. I want my film to make the most out of the genre it is intended for, therefore I will begin my first undertaking by becoming well informed in my chosen genre, suspense. Firstly, why did I choose suspense? Because of its ease of production. See, in a suspense film, visual and auditory effects are easy to produce, such as close up shots of actors, and nondiegetic sound effects used to build tension and eventually create a release of that tension.
What exactly is suspense? As characterized in a post by eNotes, "As a state of mind, suspense is characterized by anticipation. Suspense occurs when the audience is unsure of what will happen next in the story." [1] Now you may ask why did we, meaning my group, choose to produce a suspenseful film? Because of a few simple reasons. As explained earlier, a suspense film has an easy production aspect. Similarly, due to its characteristics, it is targeted toward those that are aged 18 and older due to psychological reasons/issues. In short, a suspense film is not intended for young audiences as it can cause children to have nightmares and be scared for a long period of time. [2]
All in all, this is a small step in a long journey. It will start with this blog and end with a deep, thoughtful, and thorough reflection of how I got to the final result, my film opening. There's no time to lose!
[1] What is the definition of suspense? (2012, September 5). Retrieved March 01, 2018, from https://www.enotes.com/homework-help/what-th-definition-suspense-357660
[2] Stanghello Follow. (2016, January 14). Target audience of thriller genre. Retrieved March 01, 2018, from https://www.slideshare.net/Stanghello/target-audience-of-thriller-genre
Subscribe to:
Posts (Atom)
White Coat, here it is!
White Coat has finally arrived! Here it is: Link: https://youtu.be/dvAsmo32uo0
-
While on the shoot we watched back some of the clips we shot in the camera. I think we agreed for the most part that some of the shots neede...
-
We finished editing our opening and realized it was missing something important, we were missing natural sound. The only way we could add a...
